FYIs & Best Practices
The important information listed below is broken down into 5 sections. Please make sure you read the section/s that apply to you the most. Of course everyone should read section 2. Admins should read all sections!
Knowledge Base/Help Docs
Besides the various documentation we provide, you can access more information and new feature info via our support wiki.
Support Email: [email protected]
Support hours 9 to 5pm EST Weekdays
1 Very Important (Mostly for Admins)
Running FileMaker on a stand alone server, not with other Server running is highly recommended!
Do Not Change first store # 100 to anything else. Ok to make second store # what you like.
Restart FileMaker server once a quarter. (See above for proper FileMaker shutdown before restart)
Each workstation needs to have its own printer ID selected if you will need to print from it and to a credit card terminal if needed via the workstation setting under Admin
Each workstation needs to have the Barcode fonts installed.
To make CheckIn auto launch, under FileMaker Prefs select “At startup, open file”
Have at least one daily local backup and one cloud backup
Do not track serial #’s on service parts. Why complicate life and it's not necessary!
Do not change your initially created payment methods - just create a new one and hide old one.
Visual Inspection auto launch can be enabled in order to have the Visual Inspection window pop up automatically after you enter the customer intake info. This can be enabled via Admin>Workstation>Global Setting> Type “Inspection” in the search field in the right corner - then enter the letter Y to turn this on.
When invoice is unposted is will unpost everything except a CC payment. Best to do a Post Date fix.
Multi-Store: Logout and login before running end of days if you know you've been switching stores that day.
Other:
For Apple clients:
- Dispatch ID: on GSX FedEx label is where PO# appears.
- GSX Certificates expire in 25 months; you will need to follow directions on our GSX onboarding PDF again to acquire a new cert file from Apple to apply to your server.
- The GSX Certificate are associated with a Sold To and will work with any Ship To under the Main Sold To account.
For Quilt & Fabric clients:
- To activate the special Fractions Keypad you need to open the appropriate department such as a fabric one and to the right of that window chose Y by Use # Keypad on Sale
- To take advantage of the Checkers Distributor product catalog in CheckIn you will need to create a new Supplier card in CheckIn called Checker Distributors. When creating a new PO for Checker and when searching for products to add to the PO it will search the entire Checker catalog (that syncs with CheckIn daily for updated) and you can simply click on an item to have it automatically create a new product card within CheckIn to save you time. The PO can then be submitted to Checker directly from CheckIn when posting the PO to save you more time from having to place the order via their website manually.
FileMaker Admin Stuff:
FileMaker Server Uninstaller located in Library/FileMaker Server folder
If you can’t get into the FileMaker server console go to Terminal and type: fmsadmin stop to see list of options.
Type fmsadmin HELP COMMANDS to see list of commands
Type fsmadmin STOP to Stop a server process
Type fsmadmin Restart to restart a server process
Type fmsadmin RESETPW to Reset Admin password
Router Ports to open article (main port for Server is 5003)
2 Important FYIs - All Users
Best to totally quit out of FileMaker app on each workstation at the end of day.
SRO T&Cs print on second page and best to have a double sided printer to save paper.
SRO, Quote, Orders & Invoices have same #. PO’s have their own #’s *(Do not delete an Invoice, it will also delete it's associated SRO)
Invoices need to be posted after each sale. Payments can be made to posted invoices.
Most businesses are accrual based accounting and therefore need to run sales and tax reports bases on dates posted not date of invoice.
Have to issue credit before posting invoices. If invoices are posted and you want to issue credit, you have to unpost the invoice then issue the credit. You can then click the post date fix button on the invoice to adjust post date back to the original date.
Texting Customers: Only works for sending text not receiving and with no attachments and no need to fill out the Subject section. (You will need to setup an account with https://www.twilio.com and enter your credentials into CheckIn.)
Limit Quantities to no more that 100 per line items due to how serial #’s print on invoices.
Due to page layout constraints, you need to keep line item totals to 100 for serialized products to print all serial #'s properly).
Notes on invoices shows around 12 to 14 lines then the rest flow to 2nd page etc.
Need to have at least one item on an invoice/sro/order/quote to print it. (Can use a Misc. product)
When changing store ID main Admin window it will now show results for the store you have chosen where a report pulls Store ID data like the Apple Inventory report. (End of Day and End of Month will just show the store’s numbers you have chosen)
After entering a supplier code you still need to mark it as preferred supplier.
Taking Inventory with Mobile app: First time access UN: user PW: user needs to be entered before the actual users CheckIn credentials.
Command 4 Bring up Main CheckIn Window
Command 1 to show time stamp for notes section with user initials
Gift card product ID #999 - Only use this as your gift card product since it flow properly into CheckIn.
Use Primary Phone field on customer card if you only receive 1 # from the customer (Primary # prints on Docs)
Settings Options:
- Admin > Company Setup > Global Settings > SRO Email Status Verification will allow you to turn off the confirmation dialog.
- Selling Zero Qty. in stock: Admin > Company Setup> Global Setting> search for “restrict” then change param_restrict_negative_sales to Y
- To change the default status for newly created SROs: Admin > Company Setup > Global Settings > param_default_sro_status
3 Important GSX Info - Apple clients only
GSX Technician Setup
In order to ensure smooth onboarding for CheckIn’s GSX API integration, you need to make sure each Technician who has GSX access also has Web Services activated as well. Even though a Technician is able to use GSX via a browser doesn’t ensure they will be able to use the GSX APIs via CheckIn necessarily. You will need to confirm that each technician’s Apple ID has the ability to use the GSX API by logging into your Apple “My Access” account and make sure Web Services are active for each user! See the steps below to add or confirm Web Services.
*(An image of this screen can be seen on our PDF called “CheckIn™ Customer First Steps Onboarding Info”.)
- Log into your My Access account at: https://myaccess.apple.com
- Go to My Team tab at the top menu bar section
- Click on the Switch View button at the top right of the screen
- Once you locate the technician choose the little pencil icon under the column titled “Manage Access” for the “Technician Role”
- In the “Access Role Information” section halfway down the screen, choose the Optional Privilege(s) menu and make sure Web Services has a check!
- Click Submit
GSX Lookup Issues:
If you can’t access your GSX lookups, immediately after trying, go to the Scripts menu and select “Show CheckIn Activity Log” and go to the last log and if Result show nothing then you will need to Restart the FileMaker Script Engine by doing the following:
Go into Terminal on the server and enter following command:
fmsadmin restart fmse
Then type a plain old: Y
Hit Return
*(You can create an Apple Script to automate this to happen once a day or week if you like.)
GSX Error & Emailing GSX team:
If your log file shows: HTTP/1.1 403 Forbidden & X-Apple-Error-Codes: UNAUTHORIZED
You need to email Apple GSX Web Services team at: [email protected] and copy your service rep on the email along with the Information listed below filled out as the header (at the top of your email) before composing the rest of the email and ask Apple if your IP address is no longer whitelisted and ask them to white list it again:
GSX Sold-to account number:
GSX Ship-to account number:
Contact’s name:
Contact’s email:
Apple ID for GSX Access:
Contact’s phone number:
If apple GSX Web Services team says that a certain account “no longer has GSX access” this means there is another issue with the account and it most likely has an outdated “Person Type of Developer” issue and in order to be able to use the GSX API services, you will need to have an updated Person Type which you need to rectify by emailing: [email protected]
4 CheckIn Server Backups
It's highly recommended to have at least a few hourly local backups, a progressive backup and one cloud backup of your FileMaker database. (As with any database system, a cloud or TimeMachine backup can't fully backup the active live database. These backups are basically backing up your local FileMaker backup folder found in the FileMaker folder within the Library folder. (Having a cloud and/or TimeMachine backup in place is a great idea but you will be relying on those backup systems backing up the backup of your database.)
Scheduled backups happen during various times of day you set but it’s highly recommended to activate the Progressive Backup. -The Progressive Backup is a continuous backup. (With progressive backup, the Database Server only copies the changes from the hosted file to the progressive backup folder. Progressive backups can run more quickly than a scheduled backup, with less impact on server performance.)
You can enable this by going to the FileMaker server console via safari and closing the Backups tab then on the left side down towards the middle you will see “Progressive Backup” and click “Change to Enable it. This will take you to another section in order to click on the Enable switch and to give it a folder path. FYI. You have to use an external drive for this backup and the Progressive Backup Path needs to start with: filemac:/FileMaker Backup SSD/ (the info between the forward slashes should be the name of your external drive.)
*Important- Having and off-site backup is important as well but keep in mind, some cloud backup solutions don’t backup the library folders. In this case you will need to instruct FileMaker server to do its daily backups into another folder on your hard drive outside of the default Library folder location (ex: a user folder or in your Documents folder) After creating this new folder for the daily backups you then have to have to apply FileMaker permission to the folder to get new path working. (Get Info on the folder and add user call fmserver and apply permission to that folder!)
CheckIn is not responsible for your backup setup but we are happy to offer guidance. You can search FileMaker's web site for more info on backups as well as the many other posts and resources that exist online. Here are two helpful FileMaker links:
Some Backup Ideas:
• Use TimeMachine to backup the entire server
• + Another external drive to house the Progressive backup + BackBlaze cloud backup to backup the FileMaker local backup & the Progressive backup.
• You can point the hourly backups to your iCloud drive as well. (The Default FileMaker nightly backups are saved on the server)
5 Closing the CheckIn Database Files
IMPORTANT: NEVER restart or shutdown the server until you first Close all the database files in the FileMaker Web Console.
To close the CheckIn databases Enter the FileMaker Server Admin Console via safari: http://127.0.0.1:16001
Go to the Databases tab and Close All the databases by clicking on the down arrow icon in the grey All Databases section as illustrated below and then chose Close All. This will close all the CheckIn databases and the little circle icons with the triangle in the middle will no longer be blue again.
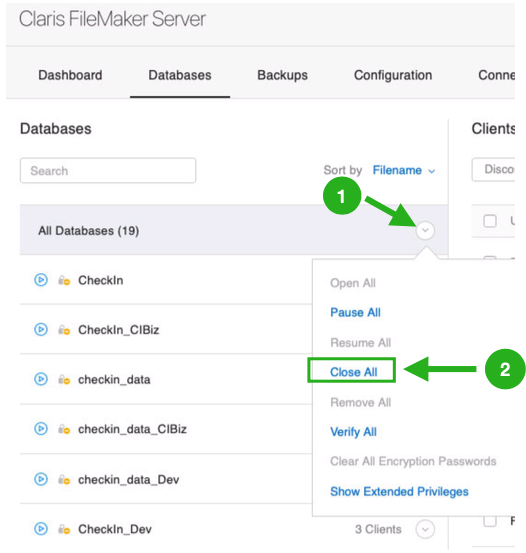
You can now safely restart your server.
Once live again, reverse the steps above to Open All CheckIn databases and the little circle icons with the triangle in the middle will turn blue again.